User Manual
Version 5
3 October 2022
User Manual
Version 5
3 October 2022
If you plan to mount your device on a wall, the backplate serves as a mounting plate. Be sure that you use a screw best suited for the wall’s material. Once the plate is attached to the wall, the magnets on the plate and the device make it a snap to mount the monitor.
Wave Plus contains six sensors that measure levels of key contributors to indoor air quality. To obtain the most accurate readings, some sensors require a period of calibration.
Download the Airthings app from the Apple App Store or Google Play Store and create an account. If you already have an Airthings account, that’s great! You’ll only need to add your new Wave monitor to it.
For Android users: The Wave Plus connects with your smartphone using Bluetooth LE. Google Android requires location permission to be enabled in order to use Bluetooth LE. This is not an Airthings requirement, nor do we collect or save your location data without your explicit permission. Need more information? Read more here.
Unbox the monitor and remove the pull-tab from the battery inside. It’s now activated and ready to begin monitoring! Open the Airthings app and log into your account. Follow the in-app instructions to locate and connect to the device.
Note: Make sure that Bluetooth is enabled on your smartphone or it won’t find the monitor!
Once you add your new Wave Plus to your account, you may be prompted to update the firmware. If so, we recommend that you take a few minutes to do it.
If you do not have an Airthings Hub or View series monitor already set up, you should skip this step and proceed to Step 4.
Once your Wave has been successfully added to your Airthings account, you can connect it to your Airthings hub device.
Note: If you want to use your View series monitor as the hub, ensure that it is plugged into a power supply. It will not work as a hub unless it is plugged in.
To link your new Wave monitor to the hub device, click the link icon that appears in the app with the Wave monitor and follow the instructions. You must be within Bluetooth range of the monitor during this process and it can take from 15 minutes or up to one hour for the connection to be established. Once connected successfully, you will see a signal strength indicator associated with the Wave monitor.
You can place Wave Plus wherever you want to measure your air quality, such as your bedroom, on the wall in the baby’s room, or on a shelf in the living room. Remember that to get the most accurate readings, some of the sensors in the monitor require an initial adjustment period to gather enough data. Refer to the calibration information for the different sensors in your Wave Plus.
Here are a few tips for optimal placement:
Some of the sensors inside your Wave Plus will provide accurate readings immediately - like temperature, humidity, and air pressure. The CO2 and VOC sensors need about one week before they acclimate to the space and provide the most accurate readings.
The radon sensor requires more time, about one month, before the monitor has collected enough readings to provide the most accurate calculation of the space’s average exposure to radon. Radon levels fluctuate naturally over time so it’s important to collect readings over a longer period to calculate the average exposure.
There is a lot to understand about radon so here are some resources we’ve created for you:
To maintain your device, simply wipe it gently with a dry cloth to keep it from collecting dust and impeding its ability to monitor the air properly.
The Airthings app indicates the remaining battery power for each monitor in your account so that you are aware when it’s time to change them. For longer-life and optimal performance, we recommend non-rechargeable, alkaline batteries. Lithium batteries are not recommended because they do not provide sufficient voltage to the device.
Note: When you change the monitor’s batteries, it can take up to 1 hour for the remaining battery power to be updated in your Airthings app.
The Airthings app is where you will interact the most with your Wave Plus. Unless your Wave monitor is connected to an Airthings hub, you must have Bluetooth enabled on your smartphone and be within Bluetooth range whenever you are checking your air quality data.
In order for the monitor’s sensors to calibrate fully to offer you the most accurate readings possible, we recommend that you keep the Wave Plus in the same space and move it as little as possible. If you do want to use the device to monitor a different space, check out the tips here to get the best results.
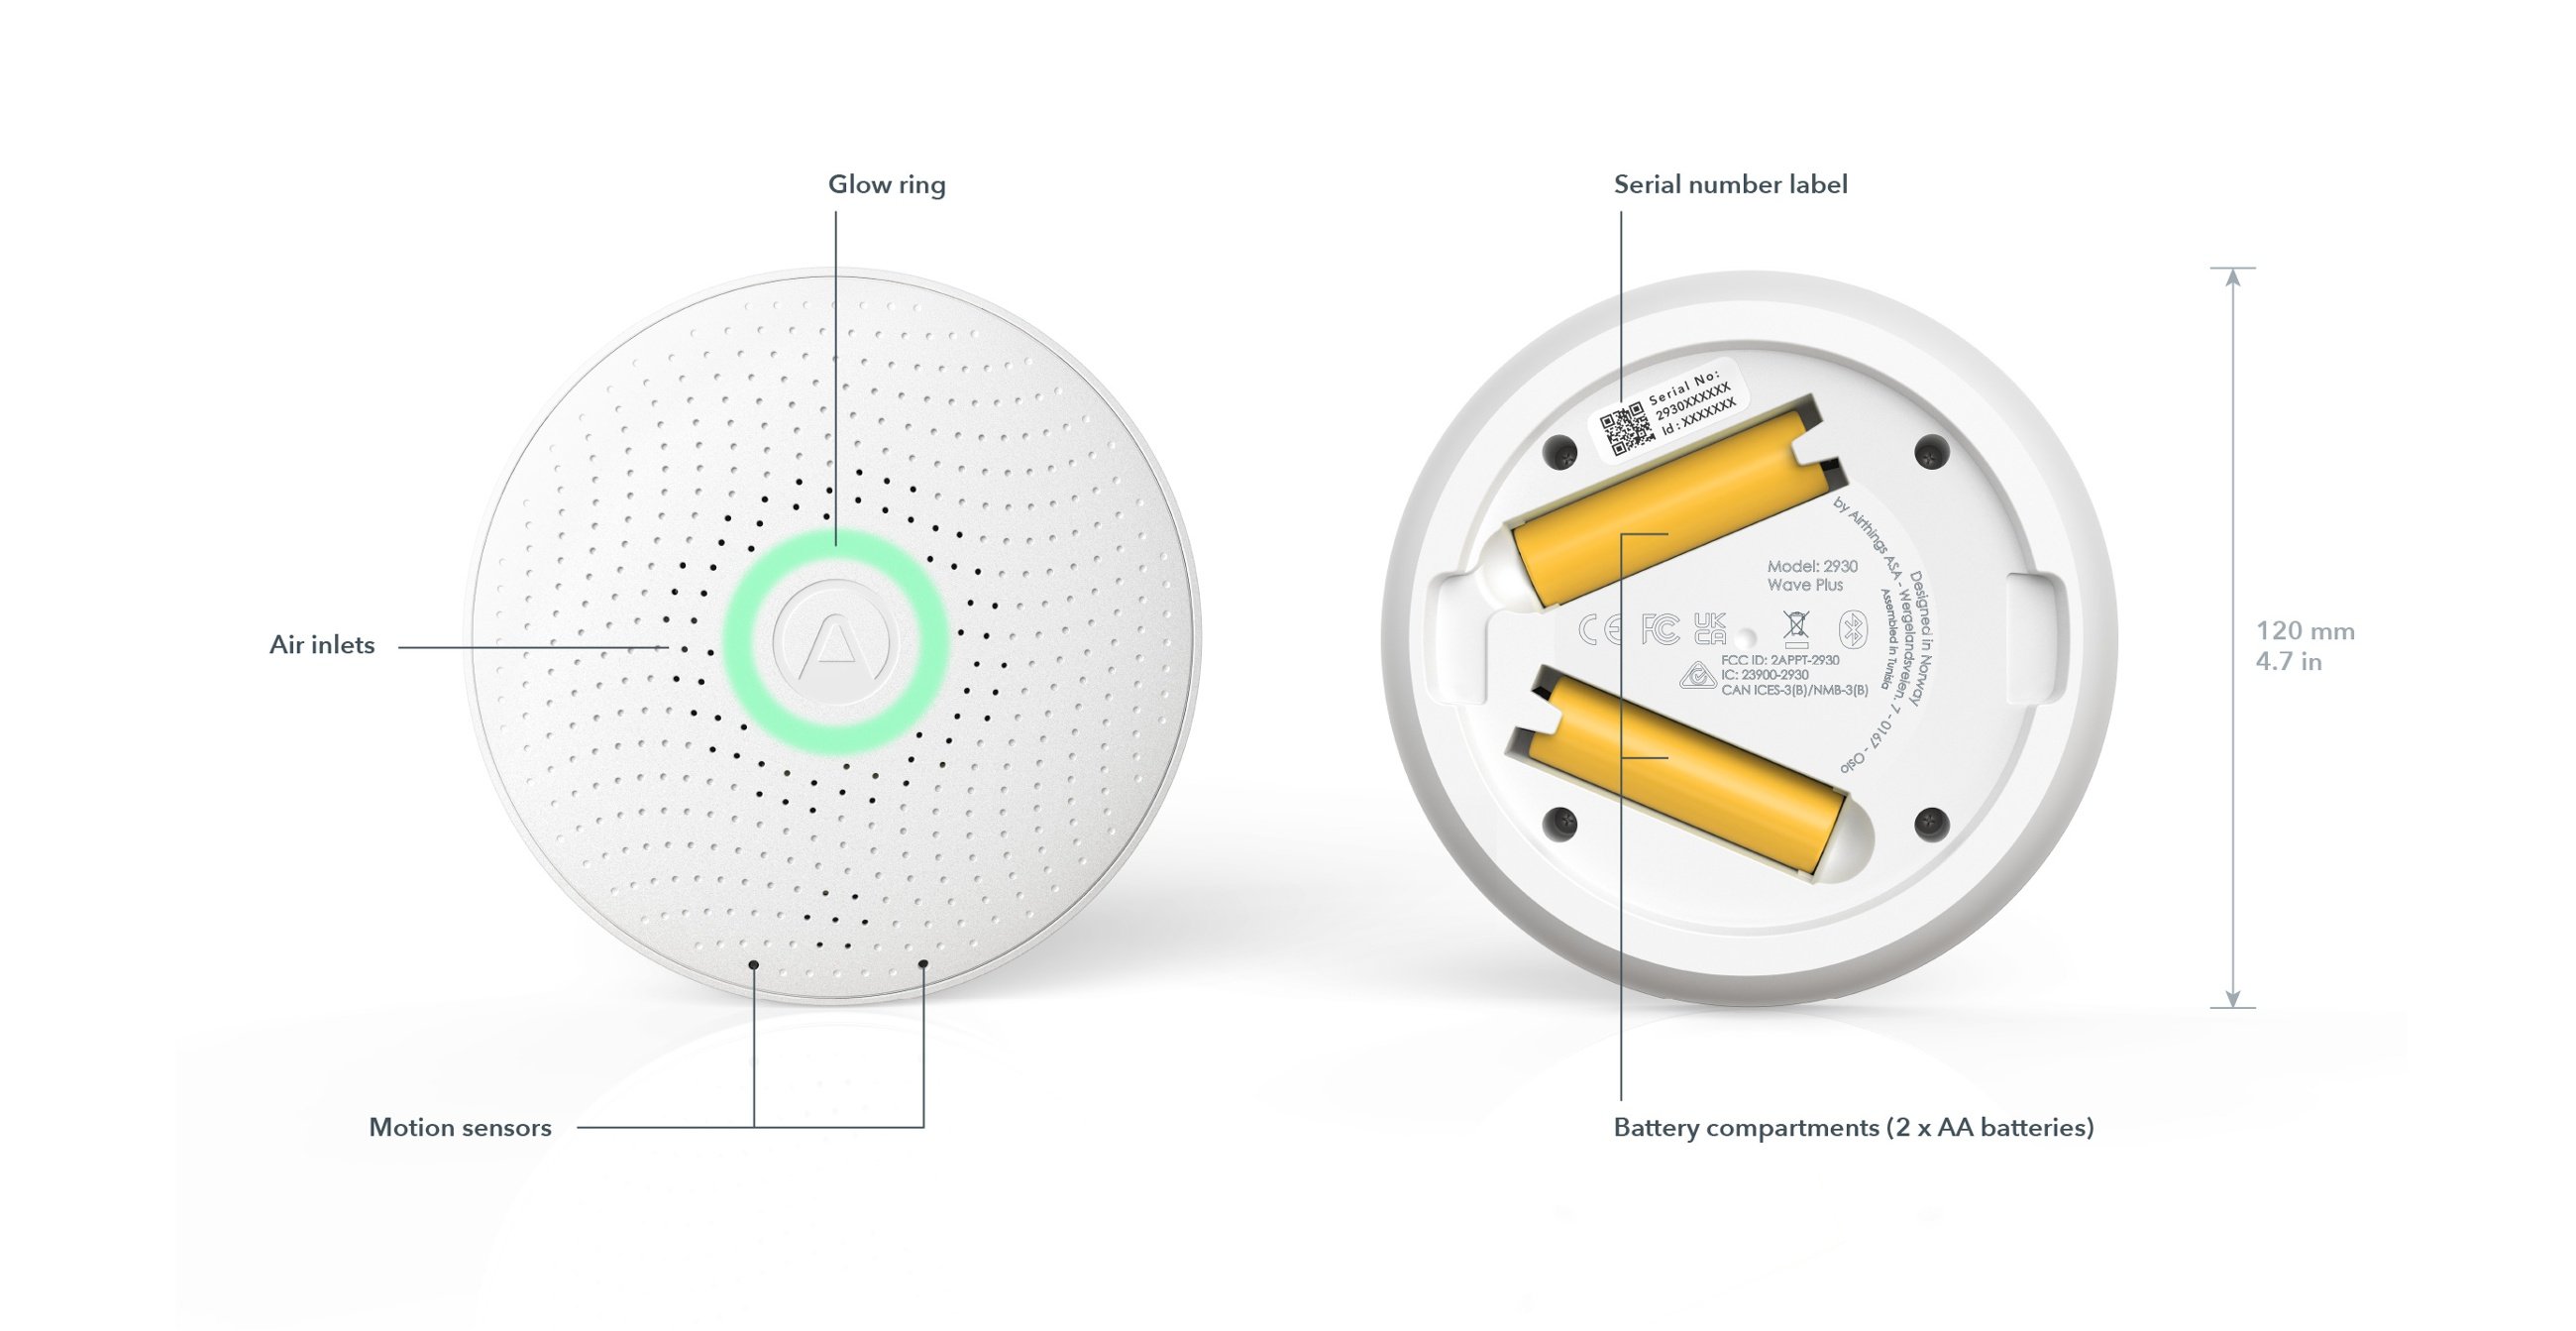
Wave Plus is equipped with a motion sensor behind its faceplate so that when you wave your hand in front of it, a color-coded ring illuminates to give you an indication of the overall air quality. The color of the ring is determined by the current readings for each sensor, excluding temperature:
 Air quality is good
The current reading for each of the six sensors are within the normal, healthy ranges.
![]() Air quality is fair
Air quality is fair
At least one of the sensors is recording a reading that is in the fair range of values.
![]() Air quality is poor
Air quality is poor
At least one of the sensors is recording a reading that is in the poor range of values.
To access detailed readings, open the Airthings app.
Open the Airthings app. The main page lists the devices that are paired with your account. Select the device whose readings you would like to analyze. The device page provides a snapshot of the current air quality values. Click on any sensor value to consult the trends over time in a line graph. You can view the trends in a graph over preset time periods and show the average value for the selected period.
You can receive notifications on your phone when a threshold is crossed and a reading is detected inside a “red” zone. To turn notifications on and off, use the Settings for the monitor in the Airthings app.
You will only receive notifications when you are within Bluetooth range of the Wave monitor. However, if your Wave is enabled for remote access via an Airthings hub device, you will receive notifications whenever a threshold is reached, no matter where you are.
After monitoring the air in one space for a while, you may want to move the monitor to understand what’s in the air in a different space in your home. There are a few ways to do this and you can get more information in our Help Center.
The two AA batteries should keep your Wave Plus running for 16-18 months but the time will come when you need to replace them. We recommend using non-rechargeable alkaline batteries. Do not use lithium batteries.
When you change the batteries, it can take up to one hour for the battery charge level to update in the app. But don’t worry, the monitor will start taking its readings as soon as the new batteries are inserted.
When you remove the old batteries, all of the sensors automatically reboot. This means that they need to recalibrate so you might notice some fluctuations in those readings in the following few days until the sensors readjust.
The most common issues customers experience are related to connectivity and syncing. Before getting to our troubleshooting guidance, let’s explain how connectivity works with the Wave monitor.
Your Wave monitor is not enabled for direct WiFi connectivity. So, how does it send its readings to your account in the cloud? It does this using Bluetooth Low Energy (BLE) to sync the data it collects with the Airthings app on your smartphone. Since it can only sync with the app when your smartphone is within Bluetooth range, you will only be able to read current measurements in the app when you are within range of the monitor. The monitor itself collects all of its readings and saves them in its local memory for up to 80 days. Each time it syncs with the app, it uploads all of the readings taken since the last time it synced. Those readings are sent through your phone to your account in the cloud. This allows you to maintain and consult the full history of the sensor readings over time.
Your Wave monitor can be enabled for remote access so that, wherever you are, your app shows you the latest readings from the monitor. How? By using an Airthings hub device. A hub device is one that connects directly to your home’s internet network and uses SmartLink*, to connect to Airthings Wave monitors in your home. The Wave monitors send their readings continuously to the hub device over SmartLink, and the hub device sends the data to your account in the cloud. Then, wherever you are, you can open your Airthings app and check the current air quality measurements taken by your home’s monitors.
Other benefits of being Hub-connected are to use voice commands with your home’s Amazon Alexa or Google Assistant devices, or to use IFTTT applets that integrate your Airthings air quality readings with your home’s smart plugs, air purifiers, humidifiers, and so on. In addition, when a hub enables your Wave monitor for remote access, you will receive any configured notifications whenever and wherever, and not just when you are within Bluetooth range of your monitor.
What are Airthings hub devices? One is the appropriately named Airthings Hub which connects to your router by ethernet cable and simply serves as a link between your Wave monitors and your home’s internet network. The other type of hub is any of our three View series monitors. These monitors contain different sets of sensors to take their own readings in a space in your home and can simultaneously be used as Airthings hubs to link your Wave monitors with your account in the cloud.
* Airthings SmartLink is a form of long-range wireless communication, developed by Airthings. It is based on the Sub-1 Ghz communication protocol and it is designed for low power consumption and long-range robust connectivity of up to approx 100m/ 330ft.
Whenever you are experiencing problems with the Airthings app or a monitor, there are some basic things you should always check first:
After following the general troubleshooting tips above, you might still be seeing a problem. Here are a few common problems and what you should do if you are not using an Airthings hub device with your Wave monitor.
|
My app is not connecting to my Wave monitor |
|
|
My app is not syncing with my Wave monitor while running in the background |
|
|
The glow ring doesn’t light up when I wave my hand over it |
|
After following the general troubleshooting tips above, you might still be seeing a problem. Here are a few common problems and what you should do if you are using an Airthings hub device with your Wave monitor.
|
I’ve set up my Airthings hub device but I cannot see the Wave monitor to link it to the hub |
Bluetooth is required to link the Wave monitor to the hub device.
Once the Wave is linked to the hub, Bluetooth will be deactivated on the Wave monitor (to reduce its power consumption). |
|
I’ve linked my Wave monitor with the hub but I am not seeing up-to-date readings from that monitor in the app |
|
If you’re still having trouble and you’ve followed the troubleshooting guidance above, it’s always a good idea to search our Help Center where we answer common questions about how Airthings monitors work and what to do when something goes wrong. If you cannot find the help you need there, you can contact our Customer Success team in the following ways:
Live web chat:
Our representatives are available on the airthings.com chatbot 18 hours a day, Monday through Friday.
Email:
Email our team at support@airthings.com and we will reply to you within 24 business hours. Please attach any photos or screen captures that may help to describe the problem. You should also include your monitor’s serial number which you can find inside the unit by removing the back plate. Finally, also confirm the email address associated with your Airthings account in case you send the email from a different address.
Wave Plus is designed to operate indoors, away from heavy dust and direct sunlight and in the following ambient conditions:
Radon
Passive diffusion chamber sampling with alpha spectrometry detection
Measurement range:
Accuracy/precision after 30 days of continuous monitoring at 5.4 pCi/L (200 Bq/m3):
VOCs
Metal oxide semiconductor sensor (MOS)
CO2
Non-Dispersive Infrared (NDIR)
Relative Humidity
Accuracy: ±3 %RH at 77 °F (25 °C) within 20-80 %RH
Temperature
Accuracy in °F: ±0.9 °F at 77 °F & ±1.8 °F from 32-140°F
Accuracy in °C: ±0.5 °C at 25 °C & ±1 °C from 0-60 °C
Air Pressure
Absolute accuracy:
± 0.6 mBar/hPA
Relative accuracy:
± 0.12 mBar/hPA